When Tine from Beautyholics Anonyomous tweeted a photo of her nail colour last month, I was instantly in love and asked her to pick one a bottle for me.
The nail polish of affection here is from Seed - a retail store founded in Melbournea 12 years ago. They have a small cosmetic range and this particular nail polish shade was on sale at a bargain of $7.95.
Seed Heritage Nail Varnish - Emerald
Let me start by saying that this even more pretty in real life than the photos suggest the shade to be.
And the name is very deceptive as well because it isn't an emerald coloured, but a rich sea-green or fresh teal shade - reminding me of mermaids and tropical lagoons.
Deceiving name aside, the colour is a gorgeous and bright - instantly cheering me up when I have it on. It contains micro-pearl (not very visible when dried) so doesn't look flat and dries to a satin finish (which I finish with a top-coat to get the glossy shiny look).
The formula is very forgiving and non-streaky, making it a breeze to apply. The bonus is that it dries quickly with 1 coat giving you a vibrant opaque colour and 2 a richer deeper hue.
I'm also happy to report that it lasts, withstanding 4 days' worth of wear without chipping and only slight fading in the edges.
Once coat of Seed Heritage Emerald
Paired with a black or dark coloured top or dress, teal coloured nails definitely adds an extra touch and makes the perfect statement nails to accesorise with.
What do you think of the colour? Do you wear brighter nail colours accessorise with the darker clothing we tend to wear in Winter?
A couple of weeks ago, I blogged about Tripollar STOP, a break-through radio frequency (RF) technology at-home device for the face and neck.
Today I’ll continue with my review on its heavy-weight sister, the POSE device.
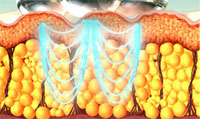
As a quick recap, Tripollar is an advance Radio Frequency (RF) technology that can penetrates to the dermis and hypodermis layer of skin where fat cell reside to heat and force the fat cells to release their liquid, causing them to shrink and contract and also stimulate dermal activity to encourage collagen production.
Tripollar POSE heat penetrating to the fatty layers of skin
Tripollar POSE:
The POSE unit is a skin
tightening device made especially for the body.
Physically, it is the same shape as the STOP device but larger, with a wider base
and the electrode tips are bigger, each about as size and shape of a
metal marble.
It has a higher output power 2.5v vs 1.5v and and it has different
preset parameters (as it doesn’t state it, I
can only make conjectures here based on information on the
manual) designed to penetrate into the fat layer to stimulate the cells to release the fat and and improve overall
skin laxity.
The POSE device promises to:
tighten slack skin (goodbye flabby upper arms
contour the body (svelte waist, here I come)
reduce the appearance of cellulite and stretchmarks (yes, please!)
break down body fat stomach and thighs (that would be a miracle!)
provide immediate and lasting results (that was my final tipping point in getting the unit)
I will include only 2 of the clinical before or after photos in this post as I feel the angle of these photos and the lighting conditions in the before and after shot were similar enough to give more accurate comparison of the differences. If you
are curious for more visuals on dramatic difference, head over to see them here and Google will be your best friend as well.
Operating the Unit
The power settings on the POSE device is on the unit instead of the power supply like the STOP unit. Once turned on, pressing the power switch will repetitively toggle from Low, Med to High.
To turn to unit on or off, just press and hold the Power button on the unit for 3 seconds.
Again for use, you apply the preparation gel (this is the same gel as the STOP unit but instead of being in a jar, it’s in an easier to dispense tube) to allow for effective conducting of the RF technology into the body.
Tip: when you need to buy the refill, get the POSE preparation gel, even if you only own the STOP device as it works out cheaper per unit.
The usage direction is very similar to the STOP but if you ever feel confused, there is even the instructional video to watch.
I begin my treatment session by concentrating on my problem zones - the butt and thighs (stretchmarks and slight dimpling which is possibly the early signs of the dreaded cellulite), calves of legs, the left waist and upper arms where skin is a bit laxed and could do with some tightening.
The recommended treatment procedure
click to enlarge: the recommended treatment time for different body zones
Some notes from my experience with the device:
I always use the device on High setting since the problem areas like the butt and legs has more fatty tissues and tolerate higher power from the start. Try the medium on the arm area if you feel the heat gets too intense. I generally don’t find much use for the low setting.
It’s quite awkward to sit semi-naked and covered with tacky gel across various parts of your body during treatment. I usually lie on the coach covered with a large towel so that the mess doesn’t go anywhere. On warm days, it’s fine but in winter, the feeling is not as pleasant. Good thing the device emits a warm sensation and heats up the area being treated but a heater wouldn't go amiss as well.
As instructed by the manual, I try to ensure the four electrode tips touch the skin to get even and optimal power and heat penetration into skin and generally have no issues but on tricky contours such as back of legs, it can be hard to tell if all four electrodes are in proper contact. When in proper contact, you will feel the warming sensation of the electrodes on your skin.
I work the device over a particular area of my body the size of my palm at a given time until it’s warmed up and the amber light on the body of the device shows up, indicating the skin area has reached optimal temperature. Given there is a larger surface area and skin is thicker in the body, this takes considerably more time. I stay on the area once its heated to the optimal temperature for another 10 seconds in the area before moving to the next section.
Like the STOP device, the lights amber light on POSE can be fiddly – it would take ages for it to turn on, especially when on high setting. On low setting (it must have a lower temperature threshold), the amber light turns on more readily and within a short period of time on a section of skin.
The bigger electrode tips makes a difference in helping to get the job done a bit quicker but is still too small in my opinion to cover a bigger area. It takes me over 40 minutes just to do each side for butt and thighs area. In total it usually takes me over 100 minutes to do my butt, thighs and calves, time I don’t really have to spare.
Using POSE on my thighs
Results and Verdict:
Reduced circumference sizes and toned skin
On my thighs and calf, I definitely feel and see that the skin has tightened. I measured the circumference of my thighs before and after 1 session and I had about 07mm shrinkage in the circumference of my thighs! On my calves, I noticed about a 4-5mm reduction in circumference.
Not each session yielded this dramatic same result though. Subsequent results only gave reduction of 1-2mm that was very hard to measure but the legs definitely look more toned and sculpt after each use. It might not sound much and doesn't warrant a photo (because it won't show up) but every bit counts and its entirely due to the use of the product, not weight change or excercise.
Tip: If you are suffering from a double chin, try using this device to help break down the stubborn fat in that area.
Tighter and Smoother Skin
When I do the pinch test on my skin on my legs, it looks and feel smoother in texture with less unevenness or dimpling effects. After 8 sessions, the improvements are plateauing but my skin is visibly more even than before I started the treatment.
Thankfully the dimpling look on the back of my legs were very minor to start off with, and with the use of this device, there really isn’t any sign of cellulite visible.
Lifted and Toned Contours
This is my favourite result. I couldn't measure myself to give definitively but for at least a week after each session, my butt definitely looks lifted and not so saggy or sad, which is always a welcomed outcome, making that almost 2 hour treatment session more palatable (I'm afraid you won't be seeing any butt pictures from me, people from work read this blog and I need to preserve some modesty!).
When pinching the area in arms where skin was beginning to become a bit loose, it felt tighter with less give and laxity. In fact I would say it is more taut and toned so that my upper arms doesn't wobble like a jello when I tap against it.
Stretchmark Improvements
The stretchmarks are definitely smoother against the rest of the skin, with the lines no longer as pitted. In terms of colour changes, my old silvery lines is slightly (it’s hard to be conclusive with such small changes) fainter in colour, blending better against the rest of skin, making them slightly less obvious (but it could be that optical illusions are at work with the smoother skin casting less shadows).
stretchmark improvements - lighting make its more dramatically improved than in real life
So although POSE can’t get rid of the appearance of stretchmarks, it definitely seems to iron them out and gives smoother looking skin on the affected areas.
Last Words:
Having been using this device for 8 sessions now, the results area nothing short of incredible on my skin. I’ve never had a topical product give so much visible difference so quickly. My only issue is the time commitment required each session on my body parts.
I wish I had the luxury of doing 2 session a week for 6 -8 weeks (treatment phase) and then twice a month (maintenance phase) as per the usage guideline but for time-poor me, it is not achievable. In the 4 months I’ve owned the device, I’ve only racked up 8 sessions and sometimes a month would lapse before next use; it feels like I’m starting off from the first session again at times especially now that winter has set and I’ve gained some weight.
If you can stay committed and want to have your body trouble spots tightened, toned and smoothed out, then POSE is the right device for you (unless you have these contra-indications).
I’m glad I own this device so that when I can have the time, it is at my disposal to put it to use. In fact, writing this review has given me renewed motivation to try and get a session in every 2-3 weeks.
What body parts you want to have zapped and shrinked?
Did you read my STOP review - that's pretty amazing too!
Tripollar POSE RRP A$499.99 online and selected Myer stores.
I love my eyeliners but the pencil or soft kohl varieties just leaves a smudging mess on my hooded Asian lids within an hour or so. Worse, some of less smudge-proof ones even migrate from the outer corner of my eyes to my undereye area, truly giving me the panda-eye look.
That’s why for days where I want fail-safe smudge free eyes (read: workdays), I stick with the liquid variety (my holy grail is still the Kiss Me Heroine Make Smooth Liquid Eyeliner), but you can’t smudge liquid liners and achieve the smokey sultry look, so I still keep a few pencils handy for that purpose.
Two of my latest pencils are from Dior and Clinique. I’ve pitted them against each other in a smudge and budge test and I have to say, the results were surprising indeed.
Diorshow Liner Waterproof in Carbon 098
Being promoted as a waterproof, eyeliner I have high hopes. The packaging of the pencil is exceptional - in a metallic sliver pencil design, it oozes 100 points in class and elegance.
Clinique Quickliner for Eyes Intense in 01 Intense Black*
In the other corner we have Clinique Quickliner Intense which is a dual-ended liner. The pencil end is capped by a plastic lid and other end houses a sponge smudger capped by a clear lid.
Top - Bottom: Diorshow Liner, Clinique Quickliner Intense
Both are automatic pencils meaning that there is no messing around with pencil sharpeners as a twist or two of the pencil would give new kohl lead to line eyes.
The Clinique Quickliner Intense is only one directional twist though, so don’t over twist as you wont’ be able to twist the lead back down and will end up with too long of a lead that will break off when you apply pressure to draw on skin, wasting the product (yes, I learnt about that the hard way).
Pigment wise, both are deep black and very intense in colour which Dior's Carbon showing up to be true black on photos more than Clinique which seemed to give a blue tint. They are easy to smoke out but on actual application, the differences between them become apparent.
Left - Diorshow Liner; Right- Clinique Quickliner for Eyes Intense
The Differences
Clinique glides on skin like butter without any tug or pull and feels almost like applying a liquid liner making it very easy to draw closely along the lines of eyes or do any tight lining (lining along the waterline).
Dior feels more waxy and takes several strokes and harder pressing for the product to warm up and get the same colour intensity and is not as pleasant to use on upper lids.
On the back of hand smudge test, Dior stands up against the test and passed with flying colours. In fact Clinique looked more smudged after rubbing it a few times on my fingers. I was impressed with Dior at this point.
Smudge test: Diorshow liner is more true black when drawn with pressure and stands up against rubbing better
Interestingly, on eyes, it was a totally different story. My oily lids seemed to wreck havoc with Dior. The pigment fallout appears quickly too and because of its harder lead, I don’t draw as intense line as with Clinique.
Within an hour of wear, Dior was giving me panda eyes with more fall out and fading of intensity. For Clinique, there was abit of budge but it was not as widespread and the intensity was still very much intact. In fact, I could wear the almost till 4 hours without constantly checking for fall out and smudging. After that, there is a bit of fade and movement which I clean up with a cotton bud.
Tip: Dip the cotton bud in foundation or concealer
first before using it to clean off product fall-out or smudges so you don’t
wipe off your base makeup from your under eye area.
Diorshow Liner - 1 hour later with a fair amount of smudge, fading and fallout
Clinique Quickliner - 1 hour later: less fallout and minimal smudging
So from a real life test, Clinique wins hands downs in my book for those with hooded or oily eye lids. It is by far more intense and longer-lasting liner that is less affected by oil; the products don't migrate as much and it just stays put. I can see myself using Clinique Quickliner for daytime wear where I want
more crisp lines with minimal fall-out and Diorshow for evenings where I’m
going to do a lot of smudging work for the smokey look since I'm bound
to get smudges already.
It just goes to shows, for eye makeup, the back-of-hand test is very deceptive if you have oily lids. Even high-end waterproof products fail on me and I really can't see myself buying another Diorshow Liner pencil when the Clinique Quickliner can be used for both day and night and is a lot cheaper too.
Have you bought any products that worked well when tested on your arm/hand but didn’t live up to expectation when put to real use?
Diorshow Liner RRP A$50 at Dior counters in department stores and selected pharmacies.
Clinique Quickliner for Eyes Intense* RRP A$34 available in 6 shades at Clinque counters and online. Product marked * was provided for consideration.
I’m extremely late to the party with this post because I misplaced these pretty babies during one of my clean up late last year and so have totally forgotten about them. I re-discovered them during a recent sorting through of my body care stash and I’m so glad to finally be able to swatch them.
Rimmel Kate Moss Lasting Finish Lipsticks
Kate Moss in collaboration with Rimmel London launched her first lipstick range in October last year and featured 9 shades in the Lasting Lipstick range. This new Lasting Finish formula is light, non-drying and has light reflecting properties to add depth and pack a punch of colour to produce intensely coloured lipsticks.
Packaged in a matte black case with a Vermillion red Kate signature, it is edgy and iconic but very practical as well.
The formula of these Lasting Finish lipsticks is very agreeing with my lips. They are quite lightweight with a satin sheen finish and don’t dry my lips out. This is handy for winter lips as it doesn’t get accentuated flakiness as much as with creamier lipsticks can.
I can wear these for 4 hours without any colour fade and still have fairly conditioned lips if I don’t drink or eat which is a great feat but the longevity does drops dramatically when food is involved and reapplication afterwards is needed to get a fresh coat of colour again.
Coverage wise, they are very buildable and the deep shades are potent – one swipe you have you intense colour and a second coat will ensure all full coverage on the entire lip. The lighter colours may require an extra coat but its light formula means it doesn’t feel thick or tacky on lips.
Now lets get to the shades I have to share.
#15 is a frosty metallic aubergine/mauve colour with that doesn’t do much to flatter my skin. It is quite sheer and takes a few more coats for the shade to show as per my swatch below. I can only see myself using this to layer over deep shades rather than on its own as it just doesn’t seem to work for me.
#10 is the true classic red with no blue or brown base whatsoever.
This intense and opaque red is something I’d rock if I feel very blah
and want to draw attention away from my tired eyes onto something more
alluring. It can be quite intimidating to wear unless you are used to
wearing brights but if you are looking for a true red lip colour, this
is the one.
# 11 is a deep vixen red. It reminds me of the Valentine roses and looks broodingly good for anyone who wants to make a statement lips Twilight style. And when this shade fades, its leaves a luscious berry stain that can carry you through a through another couple of hours with just a slick of glosss on top to give it extra shine.
#14 is a warm nude beige with a brown/pink base. If you’ve been
having problems finding a good nude lip colour, you must check this one
out. I’ve been searching high and low for a nude colour that doesn’t
look too ghastly or concealer-like on my lips and I think I’ve finally
found it here. It is neutral enough but has enough colour to not make
like I’ve lost all my blood and matches perfectly with medium
skintones.
#05 is a dusty pink shade that is neutrally balanced and works on both cool and warm complexions. It works equally well for morning, evening or a casual day out on the weekend, making it one of the most versatile shades in the collection.
As you can see, the Kate Moss collection range from bright reds to soft pinks and nudes and has a colour to suit every mood and occasion. Even beetter is that there are 6 new shades released this month to complement the existing 9 shades in the range, so there's no excuse that you won't find your perfect shade.
Rimmel Kate Moss Lasting Finish Lipstick RRP A$11.95 at Priceline, Kmart, Big Wid, David Jones, Coles, Woolworths and selected pharmacies.
These products were provided for consideration.
For most of us, even if we love experimenting with new products, we tend to stick to products from brands we have used before. After all, nothing is more powerful than the trust that we have built up for a brand through extensive use and familiarity.
Luckily for me as a beauty blogger, I have the privilege of trying out new products from new and established brands and letting you know whether a new brand or product is worth embracing and making it into your loved and trusted list.
And let me tell you, readers, I don’t take this responsibility lightly. I know the power of advocacy and the trust you bestow on me, and for that I’m very grateful and humbled. I always avoid using my influence to paint a positive picture for a product unless it is deserving of it.
So today, I want to showcase a brand that desrerves to make it to that list. Let me give you a little introduction to it.
Kio Kio is a natural bodycare range conceived in the pure lands of New Zealand and uses organic filtered spring waters and oils and native bioactive botanical extracts to give it a unique scent, luxurious texture and feel.
There is nothing synthetic in its ingredients and no chemicals that you wouldn’t want absorbed into your skin. There are four unique fragrance range from Kio Kio and each fragrance range features a body lotion, body cream, body mist, shower wash, body soap and hand cream.
I was able to road test a couple of products from their various fragrance range to get a nose of their scent and see how well the products performed.
Kio Kio Rainforest & Koromiko Body Cream 200g – NZ $49
This light and indulgence cream is like a whipped gel and is instantly cooling on skin. It has a delicate clean and fresh scent with a hint of green tea that reminds me of a running stream in a rainforest. It also contains the Koromiko flower which is a native plant and has skin healing properties.
As a moisturiser, it is hydrating and softening on skin and suitable for those who have normal to dry skin. Very dry skin types will need something more heavy duty than this jar of whipped goodness. There is no sticky residue and you get a nice sheen on skin afterwards. I like applying this after shower and allowing it to quickly absorb into the skin before wearing clothes.
Kio Kio Citrus petal & Tarata Body Wash 240ml – NZ $29
By far my favourite of the bunch I’ve tried, this shower gel is soft and unlike other citrus shower gel is can be strong and over powering, it has more of a floral and powdery base which must the Tarata flower’s influence. It is both relaxing and soothing to use and leaves my skin incredibly soft without dry it out. It’s the perfect shower prep for application of the body cream. Of course it cleanses too and does a good job of degreasing my skin, especially my back which can get quite oily during the day.
Kio Kio Pacific Tiare & Ti Kauka Hand Cream 50g – NZ $29
This has to be my favourite scent of the range. It is sparkling, floral and powdery soft orange blossom scent– much like the lighter version of the Daphne flower in the evening that immediately captivates me.
The hand cream itself comes in a pump container and my problem is that it squirts a such tiny amounts that I need quite a few pumps to get enough product to use (it’s far too fiddly for an impatient person like me - I’m used to hand creams in tubes that dispenses more product at a given time).
The product itself is light and quickly absorbed. It is a good hand cream but I personally feel I need something more intensive for my dry and roughened fingers, a by-product of not wearing gloves when doing chores.
Because of this I usually use this hand cream at work when I’m at my desk and don’t want my hands too greasy but still hydrated enough. Given the divine scent ,I’m definitely keen to try out more from the Pacific Taire & Ti Kauka range.
I’m so glad I had the opportunity to have discover Kio Kio. It’s definitely a brand with unique and amazing delicate scent and natural quality ingredients found only in a unique region of the world. Kio Kio products that is not only indulgent, uplifting and pampering in its everyday use but also gives peace of mind that its ingredients are organic and natural based are sustainably sourced. It definitely is deserving to be added to the list of brands that everyone should try and no doubt love.
Kio Kio products can be purchased online (with worldwide delivery) or at selected boutiques in Australia and New Zealand. Selected Kio Kio products can also be purchased at Amazon. These featured products were provided for consideration.