I recently have the opportunity to try to newly released Olay Regenerist Advance cleansing system and will share with you my experience today. If you’ve been hankering for a Clarisonic but can’t justify the high price for it, then this might is the right product for you to try and see if brush cleansing system is right for your skin.
Olay Regenerist Advanced Cleansing System
Whilst it’s name is a mouthful, the product is essentially a waterproof handheld device with a rotating soft brush head used to cleanse your skin.
It's battery operated, taking two AA sized batteries which adds some sturdy weight to the light plastic casing of the cleansing brush.
For first use, you place the batteries into the detachable base and then clips it back up into the body of the unit and the click in the brush head. On the body, there are two buttons: the larger on top toggles to power the unit on and off and the smaller bottom one controls its speed - low or high.
I usually use it on the high setting that produces gentle circular rotation at up to 350 revolutions per minute but is gentle enough that I don’t feel it it's overly exfoliating my skin.
In terms of cleansing, I always remove makeup first before using the brush as I find the idea for makeup remnants rotating across my face not doing much in terms of achieving a good cleanse.
I wet the brush head, apply cleanser to skin and then turn on the device and slowly move the brush across the face for about a minute.
Performance wise, it provides a deeper cleanse than manual cleansing by being able to dislodge dirt and oil out of pores better due to the fast rotating brush bristles that help to gently exfoliate (as opposed to using a cleansing cloth that can drag roughly across skin). Using it with the included Olay Regenerist Skin Renewal cleanser which has silica micro polishing beads to buff skin, I thought it might be too harsh but surprisingly it left my face was soft, supple and clean afterwards without any hint of rawness at all. My skin texture has improved over the past two weeks with a even skintone that is smoother and more refined.
I find the brush also great for reaching crevices around the nose and like to use it without a cleanser over the dry lips to help scrub off any chapped skin.
I’ve used the unit for two weeks not and the batteries show no sign of running out of juice yet so cannot give you an indication of how long a set of batteries will last but it doesn’t hurt to have a spare set handy in case you run out mid way through a cleanse.
How does it compare with Clarisonic?
Lookwise, they are different in design and weight wise, being battery operated and smaller, the Olay Advanced Cleansing System is slighter lighter than the Clarisonic Mia.
From a usage point of view, I find that Clarisonic vibrations are very strong across the Mia and Plus/Pro versions and I can’t use the devices on daily basis before it makes my skin too sensitive.
The Olay Advanced Cleansing System is a lot more gentle on my skin compared to the Clarisonic (especially the Pro version) and I actually prefer it for daily cleansing as it doesn’t aggravate my skin as much.
With the Olay Advanced Cleansing system, once daily use (at night) has so far not been a problem as it isn’t as highly powered. Don’t get me wrong, I still think the Clarisonic is great (my previous reviews on them are here), but I can’t use it daily without it being too much for my skin. For less than a quarter of the price, I think the Olay device is far better value and delivers equally effective pore cleansing results at a more gentle pace.
Olay Advanced Cleansing System available at Priceline, Chemist Warehouse and selected pharmacies RRP A$32.49. Two-pack replacement brush heads are available for A$9.99
This featured product was provided for editorial consideration.
Working in the IT field professionally, I’m quite a gadget geek. So when it comes to beauty gadgets, I’m pretty much all over them!
Before the Clarisonic cleansing brush officially made its way onto our southern shores, I had one imported (thank you online shopping) because I read so many rave reviews on it from overseas (predominately US) sites and forums. I was convinced all my skin break out problems could be solved by it. You can read about my original review of the Clarisonic PRO here.
3 years on, the Clarisonic craze has arrived into Australian shores and many out there are coveting this lush tool and deciding whether to make the investment and buy one.
So when I was recently sent a Mia for review, I thought I need to do an updated post. This time, a comparison between the Clarisonic PRO/PLUS and the Mia! I want to be able to provide some guidance to those out there deciding on which to get as I don’t see many comparison reviews available.
What is a Clarisonic?
What? You haven’t heard about it… tsk tsk. Well OK, let me give you brief summary.
Basically it’s a rechargeable and waterproof hand held tool with a brush head attachment that you use to cleanse your face.
Its selling point is that the brush bristles don’t rotate but instead vibrate 300 times per second to dislodge impurities from the pores and remove dead skin cells.
There are various brush attachments of different softness to suit different skin sensitivity levels and even a body brush if you buy the appropriate version of the Clarisonic tool.
In the Australian retail market, you can purchase the Clarisonic Mia or the Clarisonic Plus. I don’t own the Plus, but I have the PRO and they both look and functions the same except that the PRO has one more speed setting than the PLUS. So I will review the PRO as if it's the PLUS.
Physical Differences
Side by side, you can see the Mia is the baby sister of the PRO/PLUS. It’s smaller, cuter and in my case, a limited edition pink version compared to the classic white of the PRO.
Front and back of the Clarisonics - without brush attachments
The Mia is also 50g lighter (195g v 245g without brush attachments). Both fits ergonomically on the hand but on my smal palm ,the Mia feels more comfortable and slightly easier to grab.
There are fewer buttons on the mia and the light (charge) indicator is embedded inside the case of the device and can only be seen when charging.
The charging mechanism is also different. The PRO sits in a cradle to be charged whilst the Mia is attached to the base with a magnetic charger. I prefer the PRO as the cradle acts as a home for it after use.
Functional differences
The PRO is the Rolls Royce of the Clarisonic range – with 4 different speed settings (the PLUS has 3) and capable of taking on a (optional) larger body brush attachment to be used in the shower.
It has a default 1 minute running cycle for use but can be changed to 2 minutes with facial brush attachments. It also beeps at set time intervals to help you with time allocations on each part of the face you use it on.
Body brush and different face brushes
The Mia has one button – On or OFF with one speed setting (which is comparable to the lowest setting on the PRO – what I call the gentle mode). It doesn’t have any fancy beeping timer and automatically turns itself off after 1 minute of use. You can’t adjust any of these preset settings. It's one of the simplest tool to use and follows the motto of KISS - you just cannot stuff up during use.
Both products also came with sample (30ml) size facial cleansers to start you off your clarisonic cleansing journey.
Differences in Action
I use the PRO in the shower and to cleanse the face and then change to a body brush and give my back a good squeaky scrub as well. With the body brush, the device runs for 3 minutes before it switches itself off (you can turn it back on) and there are 2 different speed setting. I don’t really care much between the 2 setting and use either interchangeably.
I get the best cleanse on my body when using it and it helps keep my bacne breakout in check.
You’d think I would do this more often since it’s so good. But in reality, I only do this once or twice a week. Why? Because it’s time consuming slowing using the device to scrub such a large surface area on your body. But the main killer is that it depletes the battery of the PRO significantly. On one charge I can only get 2 showers worth of face and body cleansing (about 15 minutes use all up) before having to charge the device for 24hr before its next use – very annoying!
Mia with face brush and PRO with body brush
On the Mia, I use it once every night for 2 whole weeks and the battery is still going strong (about 14 minutes use)! Clearly it’s a winner when you are taking it with you for travels.
So although they both run for about the same time, but because of differences in use, the PRO battery capacity is clearly inadequate.
Mia v PLUS/PRO - which one should I buy?
It’s up to you but here are my observations and thoughts that might help you decide.
You really don’t need 3 or 4 speed settings to cleanse your face. Really! One option is more than enough. If you want to use different intensity or to suit different skin types, then get different brush head attachment that cater for normal, sensitive, or delicate skin. I like the delicate brush attachment best as it’s the most gentle and prefer to use the brush for a 2 minute cleanse instead of 1 minute.
- Do you need a fancy brush to cleanse your body? Probably not. A good body brush can do an equally good job. And you don’t have to worry about the battery dying in the middle of a body scrub as well.
Having the luxury of both, I now use the mia to cleanse my face and the PRO soley to cleanse my body weekly. But if I was to start from scratch, I’d stick with the MIA. The constant 24 hr charge required by the PRO is a turn off for me.
Cost of product. The mia is the entry level product and priced more than $100 cheaper than the PLUS/PRO. Cheaper doesn’t mean bad. Here, it just means fewer functions. So, if you don’t need the additional functions, you shouldn’t need to pay for it.
The Mia is $139 (US $119) whilst the PLUS is $265 (US$225). Face and body brush attachments are priced at $29 (US$25). Available at David Jones, Myer, and cheaper online at The Facial Company.
So as you can see, the Mia is clearer my preferred Clarisonic, it’s cuter, more fit for purpose and more value for money – all the things that make a gadget great! Whilst the Clarisonic Mia was provided for consideration, the PRO was purchased by me.
True story: when it comes to hair, we all want more of it on our heads and less on our bodies.
We spend countless hours and use various ways to make ourselves smooth and fuzz-free - from shaving, to waxing, to depilating, it’s become an obsession in our society. Even men are getting in on the act these days - suffice to say most of us wouldn’t mind at all to be fuzz-free for life – especially on our legs and underarms.
Once upon a time, we would try electrolysis, but that is slow, sometimes painful and definitely a time-consuming process. Thankfully, technology has improved and increased our options to bring us permanent hair removal via lasers and IPLs.
Until recently, these new options are only available at salons so you would need to book an appointment get permanent hair reduction and your hair removed. Well, now there is a new option – At home IPL hair removal with Philips Lumea IPL Hair removal system.
Philips Lumea Precision Plus - IPL Removal system (model SC2003/11)
Features
Uses IPL (Intense Pulsed Light) technology to destroy hair at follicles and prevents regrowth. Over time the follicle will die and hair will stop growing.
Is suitable for a large range of skin types from very fair to dark brown skin (but not deep drown/African skin), and a variety of hair colours
Variable energy intensity means its suitable for all areas of the skin from the legs to the face to the under arm and bikini.
Features a flash and slide function to allow faster treatment time.
Built in safety measure where IPL will flash only when correctly applied across the body.
Last up to 5 years with the lamp able to generate over 10,000 flashes ((after which it's implied that it the lamps may start to fail and as it doesn’t have replaceable parts, it probably means you will have to dispose of it).
Table showing suitability use for different skintone and hair types
The contents of the box
Philips Lumea IPL device - shaped like a space-aged nerf gun, it is very ergonomically and comfortable in the hand, with the operating button in a convenient location and the power and settings options well positioned so that there are no accidental changes of settings during use.
2 lamp window attachments for the device, one that covers a wider surface area (4cm)and another for another smaller one (2cm) with an integrated light filter for more precise hair removal at lower intensity (so is better for sensitive area such as bikini lines and facial areas).
A/C Power adaptor – the unit takes over an hour to fully charge up and gives about over 200 flashes before running low on juice again and needs to be recharged. You cannot use the device whilst it’s charging but it’s is cordless and portable when fully charged!
Instruction guides, a quick start one and a more comprehensive manual
How it works
In a nutshell, it the IPL device on, position the the lamp window over the area of the skin you want to remove hair from evenly across until the ready green indicator light on the back turns on and then press the trigger to activate the IPL flash. Too easy right?
There are 5 power settings on the device to customise the intensity of the light pulse for different types of skin as well as different part of the body (eg. lower setting on the facial and bikini region compared to the legs or underarms).
On level 5 intensity setting
This is very handy because it allows you to adjust for how well you can tolerate the discomfort during treatment and also means that almost every skin type can be treated with this device.
I’m fairly tolerant to pain and having epilated most of my life and having had previous laser hair removal treatments at salons, I knew I could handle the discomfort and so I started out with the highest (level 5) setting but I’d advise other beginner users to start with a low setting if you are unsure of your skin’s tolerance and crank up the settings the next treatment. For sensitive areas like my upper lips and bikini area, I use the level 2 or 3 setting.
I have fine short hair on my body, and didn’t feel the need to shave before treatment except for the bikini region where I have longer and thicker hair. I don’t shave mainly because it allows me to better see which area of skin I’ve flashed vs the area I haven’t because the hair does get singed once it’s been flashed.
Hair before IPL flash; after - see the singed dots of hair?
However, if you prefer not to smell the singe of hair or have long hair, shaving a day or 2 before treatment the preferred/better option. I trim my hair on my underarms and bikini because these grow longer and there is too much singeing otherwise during treatment.
Once the area of skin is pressed evenly down against the attachment window, the green indicator light comes on and you can press the trigger to flash the skin. The device then takes about 3 seconds to recharge itself before you can flash again.
How to ensure you cover all areas?
On legs and large areas you can use white (make sure it’s white so it doesn't absorb the light energy) chalk to draw 3cm gridlines (so there is a slight overlap from the 4cm lamp attachment) to help you guide through the areas you will be flashing. I have tried doing this the first time but found it too time consuming and troublesome so after I got used to the product, I started treatment without drawing on my skin. Either way, you would flashed on a straight line from top to bottom (especially on legs) before moving horizontally to the adjacent area.
You can use the glide feature of the the device to slide the unit along to the next area to be flashed, but because of the delay in re-flashing, I prefer to lift the unit off my skin and move it along to the next area to be flashed. This is obviously a personal preference and others will operate the unit in a way that is most comfortable to them.
How much did it hurt?
I didn’t find the flash on skin painful at all, it was more like an elastic band flicking against my skin and quickly dissipates afterwards although on my face and bikini area, the flicking pain was slightly more intense. I just adjust the power setting down until I’m comfortable with the discomfort before continuing the rest of the area again.
How often do you use this IPL device?
I follow the recommended usage frequency and operate the device in treatment mode, using it every 2 weeks. Over time, you will find that you will have fewer re-growth and can go for longer without treatment. This is when you enter maintenance mode. In this period you only need to flash every 6-8 weeks depending on the speed of your regrowth.
What are the results like?
Let me make no bones about this – this at-home device is never going to be as powerful as the machines used in salons. Therefore the results should never be compared vis-a-vis, on treatment-for-treatment, hair-for-hair loss basis - it just wouldn't stack up and and neither would it be fair.
What you can expect though from my experience, is that hair will begins to shed from the body 5-6 days after treatment. Coarser hair (which absorbs more of the light’s output) seems to shed more than the fine hair (which contains less melanin and therefore absorbs less light). As hair grows in different cycle during each treatment, not all hair would shed after each treatment and you can be left with patchy areas of hair after a week’s time. Shaving (required very infrequently) in between treatments ensures even fuzz-freeness during the interim treatment periods.
For my hair type, it seems to take between 4-6 treatments (about 2 to 3 months), before the hair dies and stops growing back. The hairs that do grow back are softer and finer (even in the bikini region) and also the hair regrowth is slowed down significantly after 3 treatments. Obviously this depends on the hair cycle and how strong the hair follicle is so the hair regrowth time frame vary on different parts of the body.
Using this device definitely take longer to remove hair than going to salons where the machines are more powerful and so takes fewer treatment to get the same results. But this also a lot less painful/uncomfortable given its lower power output and is effortless to use.
Final words
This IPL device has an advertised life span of 5 years so you will get plenty of time to continually use the product until all your unwanted hair is removed from your body. It is easier and more convenient since you can do it any time you have a free moment to treat yourself (or get someone to treat you for the hard to reach areas such as your back).
It will also allow you to use it as a maintenance product (every 6-8 weeks) once you’ve remove most of your hair since you will always have it at home to remove any stubborn regrowth that crops up over time.
If you are contemplating permanent hair removal, this beauty gadget must be in your consideration when evaluating all your options and I wish I had this device from day one so I didn’t have to endure those embarrassing salon visits to get my brazillians done (yikes!)
Overall I’m extremely pleased with the results and I feel this investment device (it's damn expensive with a suggested retail price of A$1299) pays for itself in the long run. I’ve honestly paid a lot more over the last 2 years to have my body treated of unwanted hair in salons and I’m still nowhere near hair-free. I’m just glad to have this device to finish off the job that was started off in the salons.
RRP A$1299.95 at all Shaver Shop nationally. If you can’t afford this new model, I'd wait for it to go on sale or pick up its predecessor - model SC2001 (which is less flashy literally with fewer flashes per charge and covers a smaller area per flash) which is currently on sale at the Shaver Shop stores for A$599.
This featured product was provided for consideration.
A couple of weeks ago, I blogged about Tripollar STOP, a break-through radio frequency (RF) technology at-home device for the face and neck.
Today I’ll continue with my review on its heavy-weight sister, the POSE device.
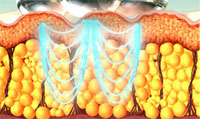
As a quick recap, Tripollar is an advance Radio Frequency (RF) technology that can penetrates to the dermis and hypodermis layer of skin where fat cell reside to heat and force the fat cells to release their liquid, causing them to shrink and contract and also stimulate dermal activity to encourage collagen production.
Tripollar POSE heat penetrating to the fatty layers of skin
Tripollar POSE:
The POSE unit is a skin
tightening device made especially for the body.
Physically, it is the same shape as the STOP device but larger, with a wider base
and the electrode tips are bigger, each about as size and shape of a
metal marble.
It has a higher output power 2.5v vs 1.5v and and it has different
preset parameters (as it doesn’t state it, I
can only make conjectures here based on information on the
manual) designed to penetrate into the fat layer to stimulate the cells to release the fat and and improve overall
skin laxity.
The POSE device promises to:
tighten slack skin (goodbye flabby upper arms
contour the body (svelte waist, here I come)
reduce the appearance of cellulite and stretchmarks (yes, please!)
break down body fat stomach and thighs (that would be a miracle!)
provide immediate and lasting results (that was my final tipping point in getting the unit)
I will include only 2 of the clinical before or after photos in this post as I feel the angle of these photos and the lighting conditions in the before and after shot were similar enough to give more accurate comparison of the differences. If you
are curious for more visuals on dramatic difference, head over to see them here and Google will be your best friend as well.
Operating the Unit
The power settings on the POSE device is on the unit instead of the power supply like the STOP unit. Once turned on, pressing the power switch will repetitively toggle from Low, Med to High.
To turn to unit on or off, just press and hold the Power button on the unit for 3 seconds.
Again for use, you apply the preparation gel (this is the same gel as the STOP unit but instead of being in a jar, it’s in an easier to dispense tube) to allow for effective conducting of the RF technology into the body.
Tip: when you need to buy the refill, get the POSE preparation gel, even if you only own the STOP device as it works out cheaper per unit.
The usage direction is very similar to the STOP but if you ever feel confused, there is even the instructional video to watch.
I begin my treatment session by concentrating on my problem zones - the butt and thighs (stretchmarks and slight dimpling which is possibly the early signs of the dreaded cellulite), calves of legs, the left waist and upper arms where skin is a bit laxed and could do with some tightening.
The recommended treatment procedure
click to enlarge: the recommended treatment time for different body zones
Some notes from my experience with the device:
I always use the device on High setting since the problem areas like the butt and legs has more fatty tissues and tolerate higher power from the start. Try the medium on the arm area if you feel the heat gets too intense. I generally don’t find much use for the low setting.
It’s quite awkward to sit semi-naked and covered with tacky gel across various parts of your body during treatment. I usually lie on the coach covered with a large towel so that the mess doesn’t go anywhere. On warm days, it’s fine but in winter, the feeling is not as pleasant. Good thing the device emits a warm sensation and heats up the area being treated but a heater wouldn't go amiss as well.
As instructed by the manual, I try to ensure the four electrode tips touch the skin to get even and optimal power and heat penetration into skin and generally have no issues but on tricky contours such as back of legs, it can be hard to tell if all four electrodes are in proper contact. When in proper contact, you will feel the warming sensation of the electrodes on your skin.
I work the device over a particular area of my body the size of my palm at a given time until it’s warmed up and the amber light on the body of the device shows up, indicating the skin area has reached optimal temperature. Given there is a larger surface area and skin is thicker in the body, this takes considerably more time. I stay on the area once its heated to the optimal temperature for another 10 seconds in the area before moving to the next section.
Like the STOP device, the lights amber light on POSE can be fiddly – it would take ages for it to turn on, especially when on high setting. On low setting (it must have a lower temperature threshold), the amber light turns on more readily and within a short period of time on a section of skin.
The bigger electrode tips makes a difference in helping to get the job done a bit quicker but is still too small in my opinion to cover a bigger area. It takes me over 40 minutes just to do each side for butt and thighs area. In total it usually takes me over 100 minutes to do my butt, thighs and calves, time I don’t really have to spare.
Using POSE on my thighs
Results and Verdict:
Reduced circumference sizes and toned skin
On my thighs and calf, I definitely feel and see that the skin has tightened. I measured the circumference of my thighs before and after 1 session and I had about 07mm shrinkage in the circumference of my thighs! On my calves, I noticed about a 4-5mm reduction in circumference.
Not each session yielded this dramatic same result though. Subsequent results only gave reduction of 1-2mm that was very hard to measure but the legs definitely look more toned and sculpt after each use. It might not sound much and doesn't warrant a photo (because it won't show up) but every bit counts and its entirely due to the use of the product, not weight change or excercise.
Tip: If you are suffering from a double chin, try using this device to help break down the stubborn fat in that area.
Tighter and Smoother Skin
When I do the pinch test on my skin on my legs, it looks and feel smoother in texture with less unevenness or dimpling effects. After 8 sessions, the improvements are plateauing but my skin is visibly more even than before I started the treatment.
Thankfully the dimpling look on the back of my legs were very minor to start off with, and with the use of this device, there really isn’t any sign of cellulite visible.
Lifted and Toned Contours
This is my favourite result. I couldn't measure myself to give definitively but for at least a week after each session, my butt definitely looks lifted and not so saggy or sad, which is always a welcomed outcome, making that almost 2 hour treatment session more palatable (I'm afraid you won't be seeing any butt pictures from me, people from work read this blog and I need to preserve some modesty!).
When pinching the area in arms where skin was beginning to become a bit loose, it felt tighter with less give and laxity. In fact I would say it is more taut and toned so that my upper arms doesn't wobble like a jello when I tap against it.
Stretchmark Improvements
The stretchmarks are definitely smoother against the rest of the skin, with the lines no longer as pitted. In terms of colour changes, my old silvery lines is slightly (it’s hard to be conclusive with such small changes) fainter in colour, blending better against the rest of skin, making them slightly less obvious (but it could be that optical illusions are at work with the smoother skin casting less shadows).
stretchmark improvements - lighting make its more dramatically improved than in real life
So although POSE can’t get rid of the appearance of stretchmarks, it definitely seems to iron them out and gives smoother looking skin on the affected areas.
Last Words:
Having been using this device for 8 sessions now, the results area nothing short of incredible on my skin. I’ve never had a topical product give so much visible difference so quickly. My only issue is the time commitment required each session on my body parts.
I wish I had the luxury of doing 2 session a week for 6 -8 weeks (treatment phase) and then twice a month (maintenance phase) as per the usage guideline but for time-poor me, it is not achievable. In the 4 months I’ve owned the device, I’ve only racked up 8 sessions and sometimes a month would lapse before next use; it feels like I’m starting off from the first session again at times especially now that winter has set and I’ve gained some weight.
If you can stay committed and want to have your body trouble spots tightened, toned and smoothed out, then POSE is the right device for you (unless you have these contra-indications).
I’m glad I own this device so that when I can have the time, it is at my disposal to put it to use. In fact, writing this review has given me renewed motivation to try and get a session in every 2-3 weeks.
What body parts you want to have zapped and shrinked?
Did you read my STOP review - that's pretty amazing too!
Tripollar POSE RRP A$499.99 online and selected Myer stores.