Showing posts with label nail art. Show all posts

Tuesday, March 19, 2013

Disco Nails with BYS Glitter Dust

I've seen many fun and innovative nail products come into the market in recent times (cue those press-on patterned nail strips, caviar nails, nail art pens etc), but nothing has gotten me as excited as the recent BYS glitter dust nail polish sets.

Not only is it give impressive results, it is very easy to apply as well – I watched this video below and knew I had to give it a go myself.

Now with your typical glitter nail polish, the glitter is already mixed into the nail enamel formula and can be hard to build a consistently glittery finish.

BYS Glitter Dust for Nails 
Shades: Star Crossed Lovers (pink) and Feeling the Sparkles (purple)
With BYS Glitter Dust, it’s actually two separate products: a normal opaque nail polish and a matching tub of micro glitter and gives you perfect results every time – I guarantee it.

How to get glamorous glittery nails in 4 easy steps
Disco nails in 4 easy steps with BYS
  1. Apply the nail polish as you would normally. 
  2. While nail is still wet, dip the nail into the tub of glitter so it sticks onto the finger nail. Don’t worry about the glitter going over the edge, as you have no product for it to stick on, it won’t stay. 
  3. Use the included a brush tool to brush off excess glitter around the edge of nails. 
  4. Slick on a top coat to seal the glitter onto nail and prevent fall outs.
  5. Viola! You are done. 
How easy was that?

Just be careful of the glitter fallout during application/dusting off so make sure you spread a newspaper under your working area to keep your table/floor clean afterwards.

The results are stunning and sparkles are like a disco ball on your digits. Available in 11 shades, there’s one to wear for every glamorous occasion when you need to bring some bling to your nails.

What do you think of these glitter nails? Are you into nail art? Share with me your thoughts.

RRP A$.795 per glitter pack at K-mart, Gloss Accessories, Cosmetics Plus, selected pharmacies and Online at Fashion Addict.

This featured product was provided for consideration.

Thursday, March 29, 2012

Easter Nails with Salon Effects

Easter is just around the corner – it’s quite scary how quickly it’s come around this year but I am looking forward to the break.

So in trying to get into the spirit of it, I have been having copious amounts of easter eggs (Cadbury Creme eggs are to-die-for!) and have even recruited my nails to partake in the festivities.

Sally Hansen have launched some very cute Easter inspired designs this year in their Salon Effects range and I had some sent to me the other week.

Sally Hansen Salon Effects Easter Edition - RRP A$14.95

The five designs are:
Checker Out - A light green gingham print
All a Flutter - pastel coloured butterflies on a white background
Mad for Plaid - checkered strips of pastels and brights.
Not a Peep - colourful little tiny chicks.
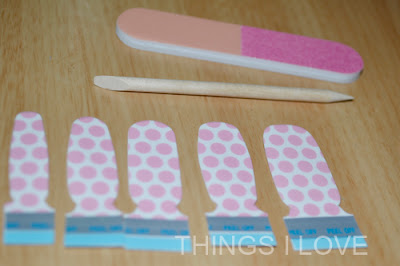
Pink-a-dot - Pastel pink on white dolka dots.

I decided that I wanted Pink-a-dot on my nails because they remind me of the wrappers of the chocolate Easter eggs that I've been devouring!

These nail strips are easy enough to apply and because my nails are not that long, I was even able to cut each nail foil in half to use on 2 fingers meaning I will be able to get 2 uses out of a pack – BONUS!
So the tips to applying Salon Effects are:
  • Match your nail size with the nail strips first and line them all up on the table in the order of your fingers so you won’t get confused when it comes time to put them on.
  • Prep your nail by pushing but the cuticles and lightly buffing the surface of your nails before application to create a non-smooth surface for the nail strips to adhere to.
  • Start with the pinky finger and work your way to applying the nail strip to your thumb. I work on the same digit on alternating hands but you can work with one hand first before doing the other – do what feels most comfortable for you.
  • Peel of the backing and position onto nail, aligning the edges on both side of the nail. Then press down very hard during application of the nail strip to help create a strong bond with the nail polish strip and your nail bed. The flat side of the orange stick is perfect for this.
  • Any excess of the strip should be folded over nail the nail edge first to create a crease line before using the included nail file to file it off – ALWAYS file in one direction only to avoid ragged edges of the nail.
  • Finish off with a top coat layer to protect the design from scratches and to give nails a high gloss shine! Every few days you can apply the top coat again to refresh the nail colour and keep it looking glossy.
lining up the nails shape helps with getting them ready for application


It took me over 30 minutes to do both hands but I’m sure as I improve my application skills, I’d be much faster. I’ve had the manicurist applies these on me in under 15 minutes!

Available now at Priceline and selected pharmacies.
This featured product was provided for consideration.

Tuesday, November 1, 2011

Sally Hansen Salon Effects

Don't have time to paint your nails before going to bed but you need them looking pretty and sparkling the next day?

Sally Hansen has the solution for you with Salon Effects. Made from real nail polish sprayed onto a layer of glue, these strips are easy to peel off and apply to nail and look as if hours has been laboured to give beautiful effects when in fact it would take less than 20 minutes to do.

The kit comes complete with cuticle stick, a mini file and buffer and 16 nail strips to fit all nail shapes and an instruction guide on how to apply the file.

Tip: Apply a base coat so the strips can adhere better to nail. Peel off paper backing and apply to nail, rubbing over the nail lengthway to remove any air bubbles and use the file to cleanly file off excess nail polish strip.

With no drying time, and resistant to lifting, these quick and easy work of art lasts over a week (especially when a clear top coat is applied after application and 3 days later to help the polish looking fresher).

And when you're ready to take them off, just use any nail polish remover to wipe them off.

With many creative designs, there's bound to be a style and design that would suit your occasion. I've got on a limited Halloween edition silver cobweb style this week in keeping with the Halloween theme but I also love current best seller 'misbehave' (nude base with fishnet stocking design).


For those of you in Melbourne, Sally Hansen has a mobile manicure bar set up at Federation Square and are offering free manicures (including the Salon Effects applications). Get there quick because their last day is this Thursday 3rd November.

Sally Hansen Salon Effects RRP A$14.95 at Priceline stores.
This featured product was provided for consideration.